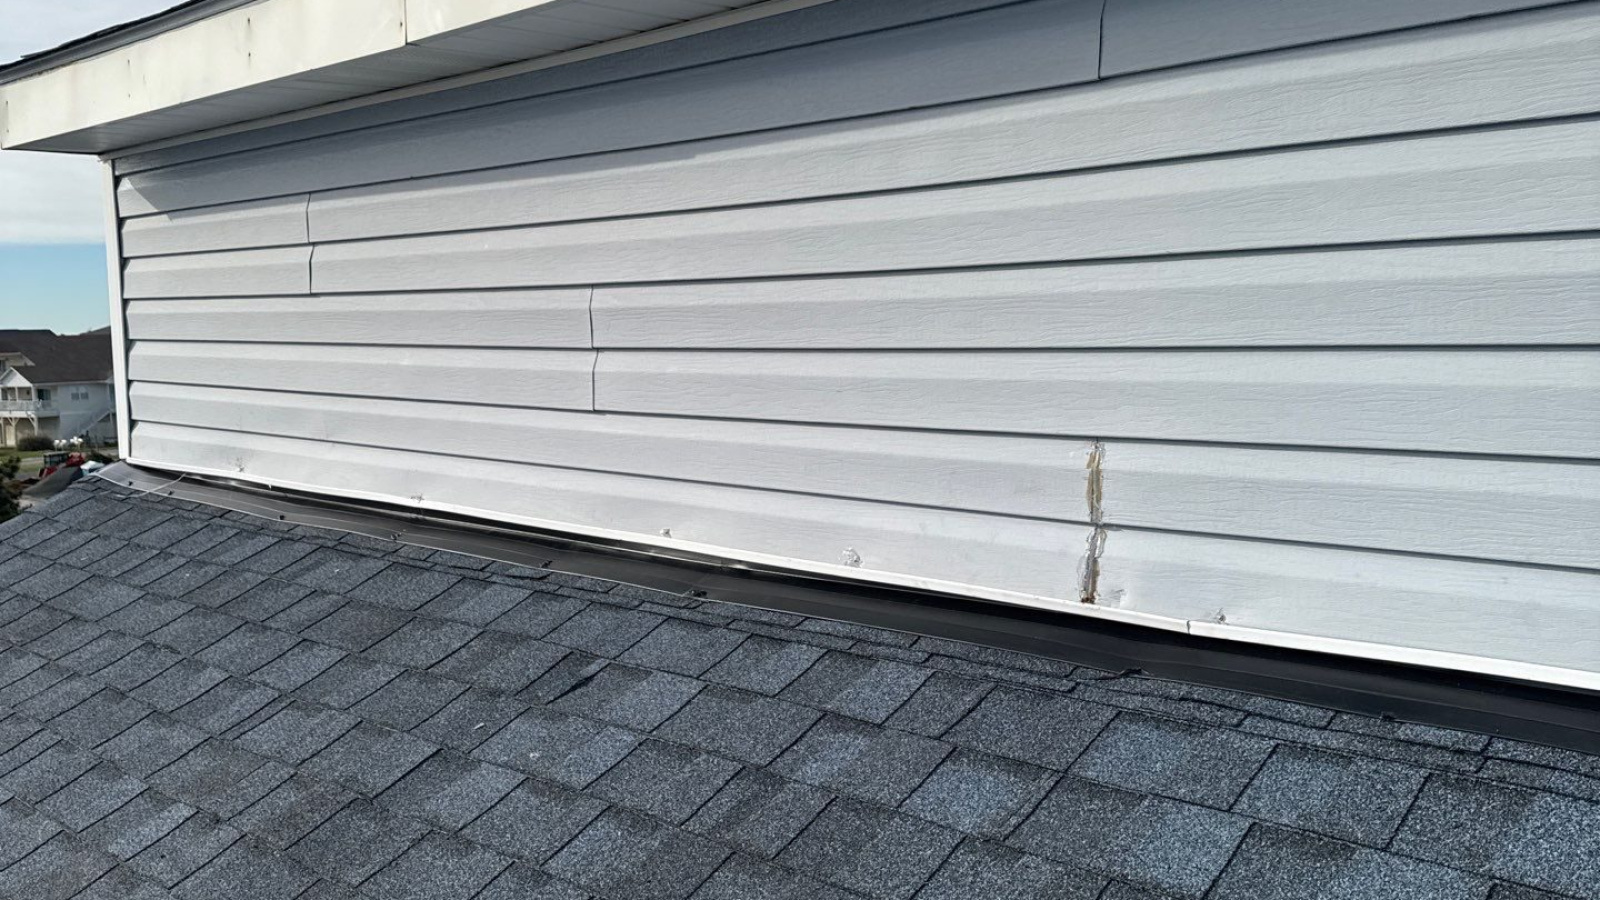
RGR project photo: shingles beside a white-sided dormer in Oak Island, North Carolina. The photo illustrates a roof-to-wall transition; it is not a diagnosis of a defect.
What is roof-to-wall flashing? It is the water-shedding connection where a roof meets an exterior wall. On a shingle roof, overlapping step flashing handles water along the slope, while a kick-out diverter at the bottom directs runoff away from the wall. If a leak keeps returning beside a dormer, porch roof or garage roof, ask for an assessment of that whole connection before approving another surface patch.
A roof can look fairly tidy from the driveway while the details beside a wall remain hard to see. That makes these intersections easy to overlook when you’re arranging repairs in Southport, Oak Island or St. James. The useful question is simple: where is the water meant to go, and what is interrupting that path?
This guide explains the terminology and the decisions worth discussing with a contractor. It is a planning guide for an inspection, not instructions for climbing onto the roof or opening a wall yourself.
Start with the place where the roof meets the wall
Look at the shape of your home from the ground. A lower roof may meet a taller second-story wall. A dormer has small walls rising out of the roof. A porch roof may end against the house. Each arrangement creates a transition between roofing and siding that deserves its own review.
The U.S. Department of Energy’s Building America guide to step and kick-out flashing describes overlapping flashing integrated with the wall’s drainage layer. Think of it as a planned route for rainwater. The visible siding and shingles are only part of that route; the layers behind them also matter.
For a homeowner, recognizing the location is more useful than memorizing a flashing dimension. Tell the contractor “the wall beside the lower garage roof” or “the left side of the dormer.” A wide photo with the area marked helps everyone discuss the same detail.
Document the pattern before deciding on a repair
Good notes can make the first visit more productive. Record when you first noticed the problem and whether it appeared during a particular rain event. Photograph the affected room and the corresponding exterior area from a safe location. Keep the original files so dates remain available.
Useful observations include a stain that returns near the same wall, paint that changes around a trim joint, or runoff repeatedly spilling along a siding corner. These clues deserve investigation, but none proves a flashing failure by itself. Give the contractor your observations without turning them into a diagnosis.
- Show the whole area. Include the nearby roof slope, wall, gutter and window when possible.
- Describe previous work. Share invoices, repair photographs and any explanation you received.
- Explain access. Mention locked gates, second-story rooms, tenant schedules or areas that require an appointment.
- Identify active water entry. Make that clear when arranging the visit so the team can discuss the appropriate next step.
Leave ladder work and opening concealed assemblies to the appropriate professional. You do not need a close-up from the roof to request a useful assessment.
Understand why a complete repair may include siding
A proposal can be confusing when the complaint is a roof leak but the scope includes wall work. Ask why those items are connected. The answer should describe what must be exposed and how the finished assembly will shed water.
DOE’s guidance for roof-wall flashing in existing homes explains that repair can require removing roofing and enough cladding to inspect underlying conditions and connect new flashing to the existing water-control layers. Damaged sheathing or framing may need attention before the area is closed. That is why access and concealed conditions deserve a place in the written scope.
Do not assume every stain requires an extensive rebuild. Ask the contractor to distinguish confirmed damage from areas that cannot be evaluated until materials are removed. That distinction helps you understand what is included now and what would require a separate decision later.
Also discuss how the wall will look afterward. Existing siding, trim profiles and paint may be difficult to match exactly. A sensible proposal identifies the intended finish, the limits of the repair area and who handles any final painting. Sorting that out before work begins is easier than debating it at the walkthrough.
Ask for a scope that explains the transition
A clear estimate gives you something concrete to compare. Instead of relying on “repair flashing” alone, ask the contractor to walk you through the location, access, materials and finish. You should be able to point to the area covered by the proposal.
- The area being repaired: Which wall intersection, side of the dormer or lower-roof edge is included?
- Removal and inspection: Which materials come off, and what underlying conditions will be assessed?
- The water-management detail: How will the roof and wall layers connect, and where will runoff leave the intersection?
- Concealed damage: How will additional work be photographed, priced and approved before it proceeds?
- Finish and cleanup: Who restores siding, trim, paint and disturbed landscaping, and what is excluded?
- Completion records: What photographs, product information and written warranty terms will you receive?
Those questions help compare scope, rather than just the total at the bottom of a page. A smaller price may reflect a smaller work area or different finish assumptions. Ask for those differences to be explained in writing before choosing.
Coordinate roofing and exterior work before either starts
If you are already planning siding work or a roof replacement, bring up every roof-to-wall intersection during the estimate. One contractor’s scope should not quietly assume that another crew will finish the connection. Name the responsibility and agree on the sequence.
For a home used seasonally, arrange access and choose who can approve a documented change if you are away. Ask where progress photographs will be shared and how weather-related schedule changes will be communicated. These practical details help keep a small repair from becoming a drawn-out exchange of messages.
RGR’s Southport roofing service includes assessment of flashing, leak paths and exterior tie-ins. If the concern also involves the wall or adjacent structure, explain that when requesting the visit so the scope can be considered together.
Have a recurring leak near a roof-to-wall connection? Request an RGR Southport estimate and include the property location, a short description and any safe ground-level photos. A useful first step is a clear explanation of the area being investigated and the work recommended.
Frequently asked questions
Is step flashing the same as kick-out flashing?
They serve related but different parts of the connection. Step flashing follows the sloped roof beside a wall; a kick-out diverter handles runoff at the lower end. Ask the inspector to identify both details where applicable and explain how they connect with the wall’s water-control layer.
Can a roof-to-wall leak be diagnosed from a ceiling stain?
A stain helps identify where water became visible, but it does not establish the entry point. Share its location, timing and repair history. The assessment should consider the nearby roof and wall details before recommending a particular repair.
Does flashing repair always mean replacing the roof?
No. Existing-home guidance describes flashing work as a possible stand-alone repair as well as part of reroofing or exterior wall work. The appropriate scope depends on the condition and accessibility of the surrounding materials. Ask which findings support the recommendation.
Why might the contractor need to remove good-looking siding?
The visible surface may cover the connection that needs inspection or repair. Ask exactly what must be removed, what will be reused, how damage discovered underneath will be handled and what finish matching is included. Appearance alone does not answer those questions.
What should I send RGR before a Southport roof inspection?
Send the property address, a description of the affected area, when the issue appears and any previous repair records. Include wide photos taken safely from the ground or inside the home. You do not need to climb onto the roof or remove siding to prepare for the visit.